
Cordelia Top / Shrug / Dress Pattern
- Callie Z
- Sep 9, 2024
- 10 min read

Updated: Oct 3, 2024
The Cordelia top is designed and recommended for the INTERMEDIATE crocheter. The top is made TOP-DOWN and IN THE ROUND, requiring NO SEWING. You will need to measure yourself for this pattern since it is MADE TO MEASURE.
There is a bit of math involved in order to properly size your garment, this math can easily be typed into a calculator and there is a measurement guide for visual aid. I provide photos, notes, and tips throughout the pattern.
The Shrug and Mesh Top are suitable for YARN WEIGHTS 1-3, any larger yarn size will not result in the same beautiful drape.
For The Original Cordelia Version (blue), use ONLY WEIGHTS 1 & 2! WEIGHT 3 DOES NOT WORK for the Original Cordelia Version. Use directed hook size found in the materials section.
Yardage needed to complete this top varies based on customizations such as sizing, length of sleeves, & length of top. This top DOES NOT HAVE A SET GAUGE so make sure to use the correct hook size for your yarn weight.
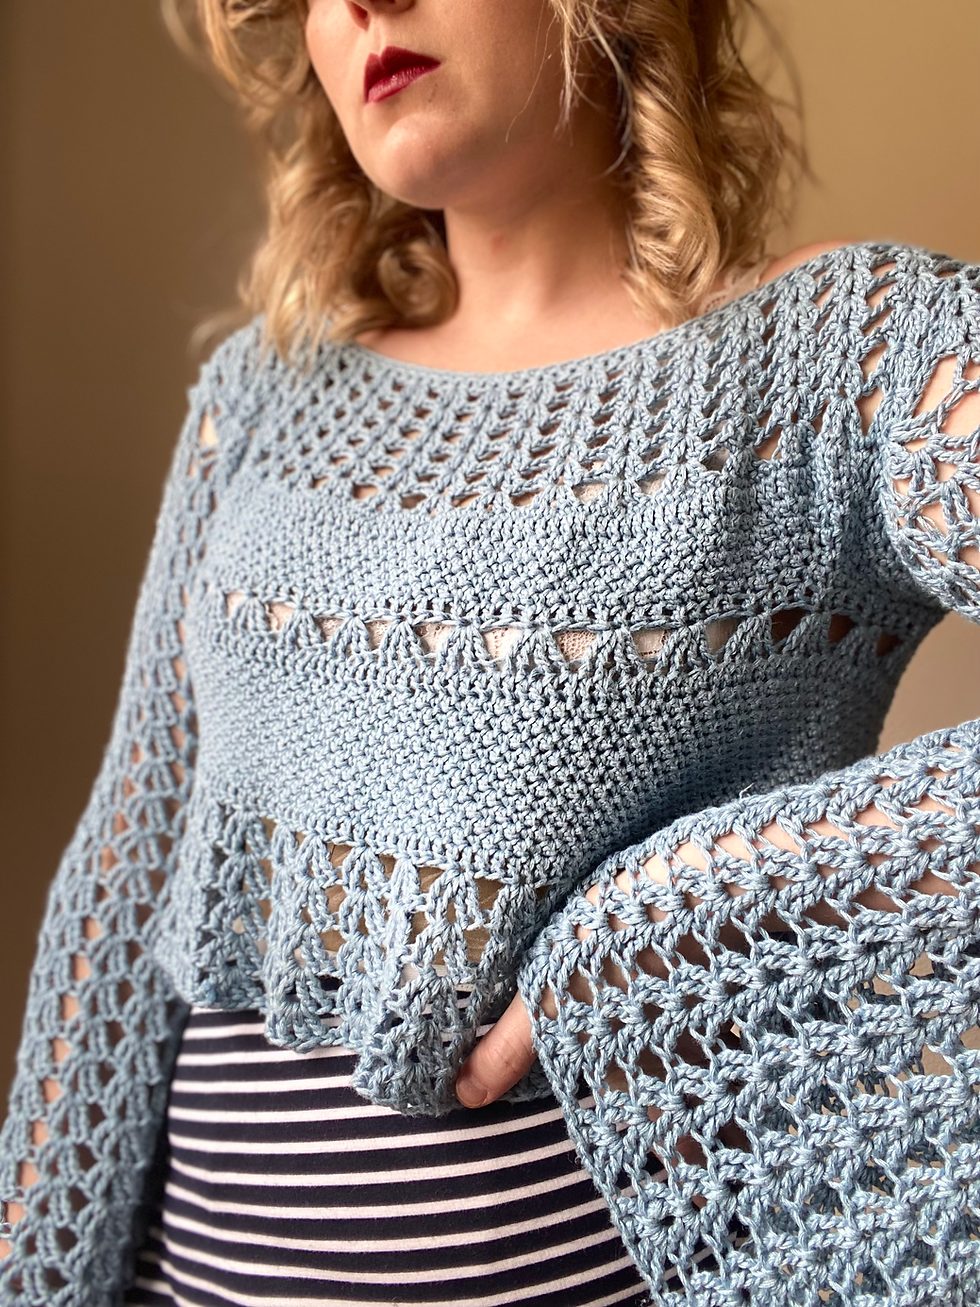
For my Blue Cordelia Top (Original Version): I used Sport Weight/ 2 Weight Yarn with 4.5 hook (I used Ganxxnet 100% Bamboo, about 600 yards, I am typically a Size M)
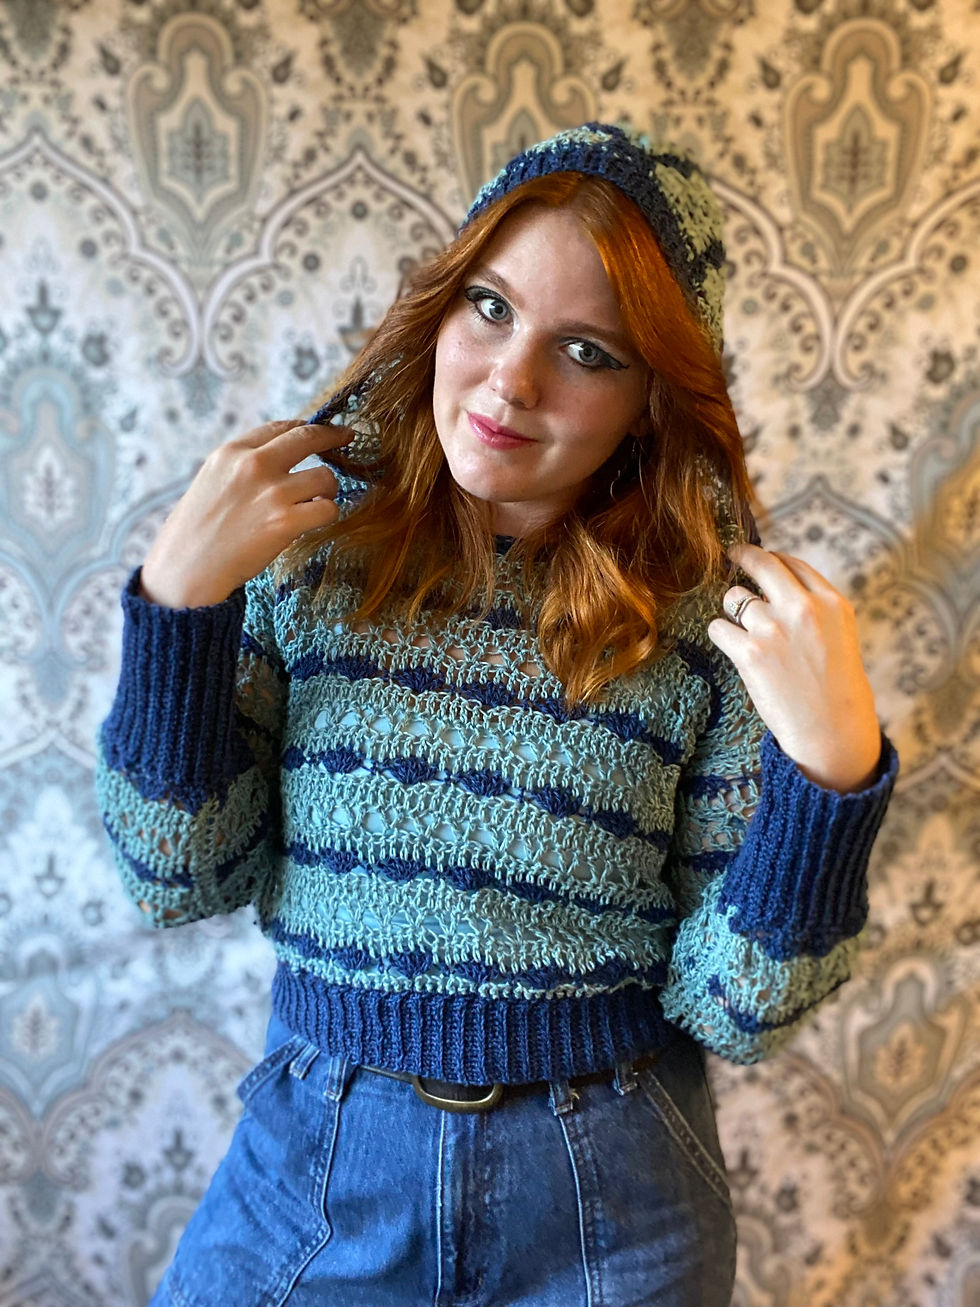
For the White Top (Shrug): I used DK Weight/ 3 Weight 100% Cton Yarn with a 5.5mm hook (24/7 Lion Brand Cotton, DK about 330 yds, I am typically a Size M)
For the Green Top (Mesh Top): I used: DK Weight/ 3 Weight yarn with a 5.5 mm hook (BERNAT Softee Baby Cotton, about 450 yds, I am typically a Size M)


Copyright Notice
© CAZ Crochet– All rights reserved. This pattern and its contents are for personal use only. Do not copy, edit, reproduce, or sell this pattern in part or in its entirety. You may make finished items and sell them, but please credit CAZ Crochet. Thank you!
Terms & Stitches to Know
FDC: Foundation Double Crochet
SC: Single Crochet
DC: Double Crochet
TC: Triple Crochet
V-ST/V-ST Sp: V-Stitch
TC Cluster: Two TC, Ch1, Two TC all in the same stitch. OR Three TC, Ch1, Three TC all in the same stitch (See image below, all are clusters, I circled one from each row)
Cluster Space: The space between two cluster stitches. (See image below)
Ch Sp: The Ch1 space sandwiched between 4 TC or 6 TC (See image below)
Ch/Tch: Chain/ Turning Chain SK: SkipST: StitchStM: Stitch Marker
FO: Fasten Off

Materials
❖ Any yarn weights 1-3
❖ Corresponding Crochet Hook Size:
❖ For1weightyarn: 3.5mmhook
❖ For2weightyarn:4.5mmhook
❖ For3weightyarn:5.5mmhook
➢ For The Original Cordelia Version,only use weights 1 & 2! Weight 3 does not work for this version.
❖ MeasuringTape
❖ Scissors
❖ DarningNeedle
Measurements:

Measurement A: Measure from the outermost part of your collarbone, across the front of your chest, to the outermost part of your other collar bone. Write down the measurement, then subtract 1 inch (2.54 cm). Finally, you will multiply that number by 2. The number you get after solving is your measurement A. See below for an example equation.
Ex. 14in - 1in = 13 in 13in x 2 = 26 inches
26 inches is the measurement A for this example
NOTE: Fill out your measurements & FDC # of STs on a sheet of paper and and refer to them as needed.
Section 1 - Body:
Chaining: FDC until chain is as long as your MEASUREMENT A and is a MULTIPLE OF 3. SLST first and last STs in row together to form a ring. Make sure not to twist the row.
ROUND 1: CH4, TC1 in same space, CH1, TC2 in the same space, SK2 STs *TC2 in next ST, CH1, TC2 in same ST, SK2 STs* Repeat sequence between * all the way around the row.
After the final cluster, instead of SLST first and last CH together, start the row 2 sequence. (this will leave a small gap, we will fix this later. Start using a StM now to mark the first cluster of
every row.
Place the StM in the CH SP of the cluster you are marking. This is how we will start every round. See images below.

The first image above depicts the first row starting clusters and skipping stitches. The last five images depict how to start working your TC clusters in the round instead of slip stitching your rows together.

ROUND 2: TC2 in the first CHSP, CH1, TC2 in the same CHSP *TC2 in the next CHSP, CH1, TC2 in same CHSP * Repeat sequence between * all the way around the row. See image to the left.
Take care to count how many clusters you have after Row 2, we are going to need that cluster count to do some math in a moment.
Place a StM in the center of the first cluster of each row.
MATH portion!

Take your total number of clusters and multiply it by 0.40 (round to nearest whole number). The number you get here is the number of clusters you will have for the “front” and “back” of the Top (We will call this the “body” of your Cordelia).
Now take your total number of clusters and multiply it by 0.10 (round to nearest whole number making sure to have the same number of clusters on each arm hole). The number you get here is the number of clusters you will have on each armhole. This will become larger later with increases.
Mark off with StMs for the start and end of each arm hole, make sure to move StMs up with each row. If there are an uneven number of clusters due to making the sleeves the same number of clusters, let the era cluster sit in the “front” side of the top. See Image above for how I marked my STs.

ROUND 3:
Body Sequence
TC2 in CHSP, CH1, TC2 in same CHSP * Repeat sequence between * until you get to a StM marking the start of the first arm hole section.
Sleeve Sequence
*TC3 in CHSP, CH1, TC3 in same CHSP * Repeat sequence between * until you get to a StM marking the end of the first arm hole section. End the sleeve section with a TC3 cluster in the CHSP with StM (See Image).
Body Sequence
*TC2 in CHSP, CH1, TC2 in same CHSP * Repeat sequence between * until you get to a StM marking the start of the second arm hole section.
Sleeve Sequence
*TC3 in CHSP, CH1, TC3 in same CHSP * Repeat sequence between * until you get to a StM marking the end of the second arm hole section. End the sleeve section with a TC3 cluster in the CHSP with StM.
ROUND 4:

Body Sequence
*TC2 in CHSP, CH1, TC2 in the same CHSP *Repeat sequence between * until you get to a StM
marking the start of the first arm hole section.
Sleeve Sequence
*TC3 in CHSP, CH1, TC3 in the same CHSP. TC 1 in CLSP, Ch1, TC1 in same CLSP* Repeat sequence between * (alternating between Cluster & V-ST until you get to StM marking the end of the first arm hole section. End the sleeve section with a TC3 cluster in the CHSP with StM (See Image).
Body Sequence
*TC2 in CHSP, CH1, TC2 in the same CHSP * Repeat sequence between * until you get to a StM marking the start of the second arm hole section.
Sleeve Sequence
*TC3 in CHSP, CH1, TC3 in the same CHSP. TC1 in CLSP, Ch1, TC1 in the same CLSP * Repeat sequence between * which alternates between Cluster & V-ST until you get to a StM marking the end of the second arm hole section. End the sleeve section with a TC3 cluster in the CHSP with StM.
ROUND 5:
Body Sequence
*TC2 in CHSP, CH1,TC2 in same CHSP* Repeat sequence between * until you get to a StM marking the start of the first arm hole section.
Sleeve Sequence
*TC3 in CHSP, CH1, TC3 in the same CHSP, TC2 in the V-St Sp, Ch1, TC2 in same V-St Sp* Repeat sequence between * until you get to a StM marking the end of the first arm hole section. End the sleeve section with a TC3 cluster in the CHSP with StM (See Image).
Body Sequence
*TC2 in CHSP, CH1, TC2 in same CHSP * Repeat sequence between * until you get to a StM marking the start of the second arm hole section.
Sleeve Sequence
*TC3 in CHSP, CH1, TC3 in the same CHSP. TC 2 in the V-St Sp, Ch1, TC2 in same V-St Sp * Repeat sequence between * until you get to a StM marking the end of the second arm hole section. End the sleeve section with a TC3 cluster in the CHSP with StM .
TIP: When chaining for the sleeves in row 6, chain however many chains you need (must make a multiple of 4) so that the sleeve fits snug, but is still comfortable! Try the top on to check sizing and adjust as needed before moving to the ne row. When it is time for you to CH In the directions, I will write it as “CH #”

ROUND 6:
Body Sequence
*TC2 in CHSP, CH1, TC2 in same CHSP * Repeat sequence between * until you get to the StM marking the start of the first arm hole section.
Sleeve Sequence
*TC2 in CHSP, CH1, TC2 in the same CHSP* in the first cluster of the sleeve (where the stitch marker was). CH # and SK the STs between StMs and anchor the CH with a TC2 in CHSP, CH1, TC2 in the same CHSP in the last cluster of the sleeve (where the StM was).
Body Sequence
*TC2 in CHSP, CH1, TC2 in same CHSP * Repeat sequence between * until you get to a StM marking the start of the second arm hole section.
Sleeve Sequence
TC2 in CHSP, CH1, TC2 in the same CHSP in the first cluster of the sleeve (where the StM was). CH # and SK the STs between StMs and anchor the chain with a TC2 in CHSP, CH1, TC2 in the same CHSP in the last cluster of the sleeve (where the StM was).
TIP: Leave BOTH Sleeve StMs in place for now, come back to them in SECTION 2: SLEEVES
ROUND 7:
Body Sequence
*TC2 in CHSP, CH1, TC2 in same CHSP* Repeat sequence between * until you get to a StMs marking the start of the first arm hole section.
Sleeve Sequence
*TC2 in chain stitch, CH1, TC 2 in same chain stitch, SK3 STs* Repeat sequence between * until you get to a StM marking the end of the first arm hole section.
Body Sequence
*TC2 in CHSP, CH1, TC2 in same CHSP * Repeat sequence between * until you get to a StM marking the start of the second arm hole section.
Sleeve Sequence
*TC2 in Chain ST, CH1, TC 2 in same Chain ST, SK3 STs * Repeat sequence between * until you get to a StM marking the end of the second arm hole section.
Row 8: *TC2 in CHSP, CH1, TC2 in same CHSP * Repeat sequence between * all the way around.
FOR THE MESH OR SHRUG VERSIONS, REPEAT ROW 8 UNTIL THE BODY OF YOUR TOP IS AS LONG AS YOUR MEASUREMENT C.
ROUND 9: DC into each ST, including CHs. (If making The Original Version, make sure to end round 9 with an even number of DC, INC/DEC as needed).
FOR THE SHRUG & MESH VERSIONS, ROUND 9 IS THE FINAL ROW OF THE BODY. SLST THE FIRST AND LAST DC TOGETHER, FO AND SKIP TO SECTION 2: SLEEVES (SKIP ROWS 10-31).
ROUNDS 10-15: SC, DC around the body of the top. Make sure to always SC into the DC from the previous row and always DC into the SC from the previous round.
ROUND 16: DC around the body of the top.
ROUND 17: CH4, TC1 in same ST, CH1, TC2 in the same ST, SK 3 STs *TC2 in next ST, CH1,TC2 in same ST, SK 3 STs *Repeat sequence between * all the way around. SLST first and last ST.
ROUND 18: CH2, DC into each ST, including CHs around the body of the top.
ROUND 19-28: SC, DC around the body of the top. Make sure to always SC into the DC from the previous row, and always DC into the SC from the previous round.
ROUND 29: CH2, DC into each ST, including CHs around the body of the top.
ROUND 30: CH4, TC1 in same ST, CH1, TC2 in the same ST, SK 3 STs *TC2 in next ST, CH1,TC2 in same ST, SK 3 STs* Repeat sequence between * all the way around.
ROUND 31: *TC2 in CHSP, CH1, TC2 in same CHSP * Repeat sequence between * all the way around the row.
Repeat ROUND 31 until the body of the top meets your MEASUREMENT C
Section 2 - Sleeves:
Attach yarn where one of your two sleeve StMs are placed. Move that StM up when the first cluster in the row is finished (leave second StM in place for now).
ROUND 1: PART A: CH4, TC1 in the same CHSP, CH1, TC2 in the same CHSP. *TC2 in next CHSP, CH1, TC2 in same CHSP * Repeat sequence between * all the way around the sleeve hole until you get to your second StM. Leave the second StM at the
base of the sleeve to note where your first sleeve row is located. Then start part B. (see images).
PART B: Now you will continue *TC2 in ST, CH1, TC2 in same ST * except since there are no more CHSPs to work into, you will use the base of the clusters (see third image below).
Instead of SLST first and last CH together, just keep repeating the sequence between * making sure to move up the stitch marker with each new round. See image. (see images below)

ROUND 2: *TC2 in next CHSP, CH1, TC2 in same CHSP * Repeat sequence between * all the way around, making sure to move up the one stitch marker with each new row.
ROUND 3-13: Repeat ROUND 2 until you have 13 rounds or the sleeve meets the bend of your elbow. If you reach the bend of your elbow before 13 rounds, skip to round 14.


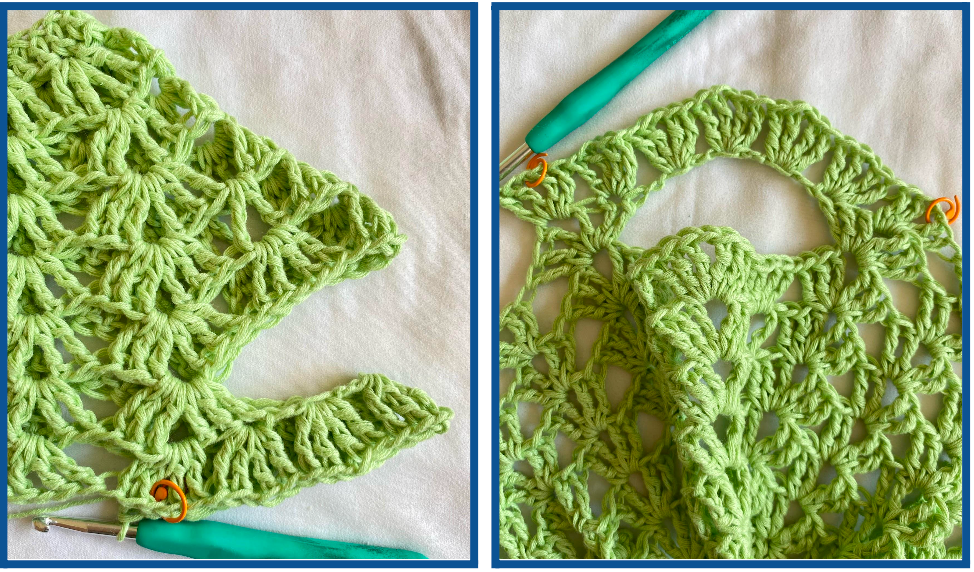
Row 14:*TC2 in next CHSP, CH1, TC2 in same CHSP* **TC3 in next CHSP, CH1, TC3 in the same CHSP ** Alternate between sequences * and ** making sure to move up the stitch marker with each new round (See First Image of the two to the left).
Rows 15-16: Repeat row 14 for two more rows (See Second Image of the two above).

All Remaining Rows: *TC3 in next CHSP, CH1, TC3 in the same CHSP * Repeat sequence between * all the way around, making sure to move up the stitch marker with each new round.
Try on your top frequently to check sleeve length. When you reach your desired sleeve length (MEASUREMENT B), SLST into CH SP with the StM, FO and weave in the ends.
Repeat Section 2 steps for the next sleeve.
Final Note (Optional): If your neckline stretched out a bit as you added length and sleeves to your top, do a quick SLST around the neckline to tighten it back up! For this part, use a hook size that is 0.25-0.5mm smaller than what you used for the whole top.
Congratulations on finishing your Cordelia! Make sure to post pictures of your Cordelia and tag me @caz.crochet on Instagram. I can’t wait to see how it turned out!!

Comments